Category Archives: Paper + Fabric

Crafts as gifts, hobbies and my creative outlet

A Vintage Inspired Halloween Dinner Party

nikkiikkin halloween 1

Halloween Dinner Party 2012

Last year this Halloween dinner party was featured on Amy Altas just a few days before Halloween.   We all know that as soon as its November 1st no one wants to look at Halloween pictures anymore. So I’ve held on to these pictures for almost a whole year!

nikkiikkin halloween 15

My party was inspired by vintage Dennison Bogie Books.  After deciding that I needed to know the origin of the iconic screeching Halloween cat face that pops up everywhere, I did a little research and discovered Dennison Boogie Books dating as far back as 1912.  I fell in love with its wholesome and kitschy suggestions and illustrations of a bygone era.  Most importantly I found inspiration in revitalizing the use of crepe paper as in inexpensive decoration material.

nikkiikkin halloween 20

I sought out a few vintage Dennison Halloween die cuts and illustrations on ebay to reproduce, ordered a republished copy of a 1926 Bogie Book and a few rolls of crepe paper.  The rest of the decorations were from our curated Halloween collection.  And of course all the treats were made by me!

nikkiikkin halloween party 3

The invitation is vintage, sort of, I designed and drew it 8 years ago….pre photoshop knowledge.  Back in the day, I loved to make hand cut and one of a kind cards from card stock.  A reader informed me that the technique I used to make this card is called typesetting, who knew?  I just did what I had to do to get stuff done, I still do!  You can check out more about this card HERE and know that you can still create a beautiful invitation even if you don’t have skills of a graphic designer.

nikkiikkin halloween party 12

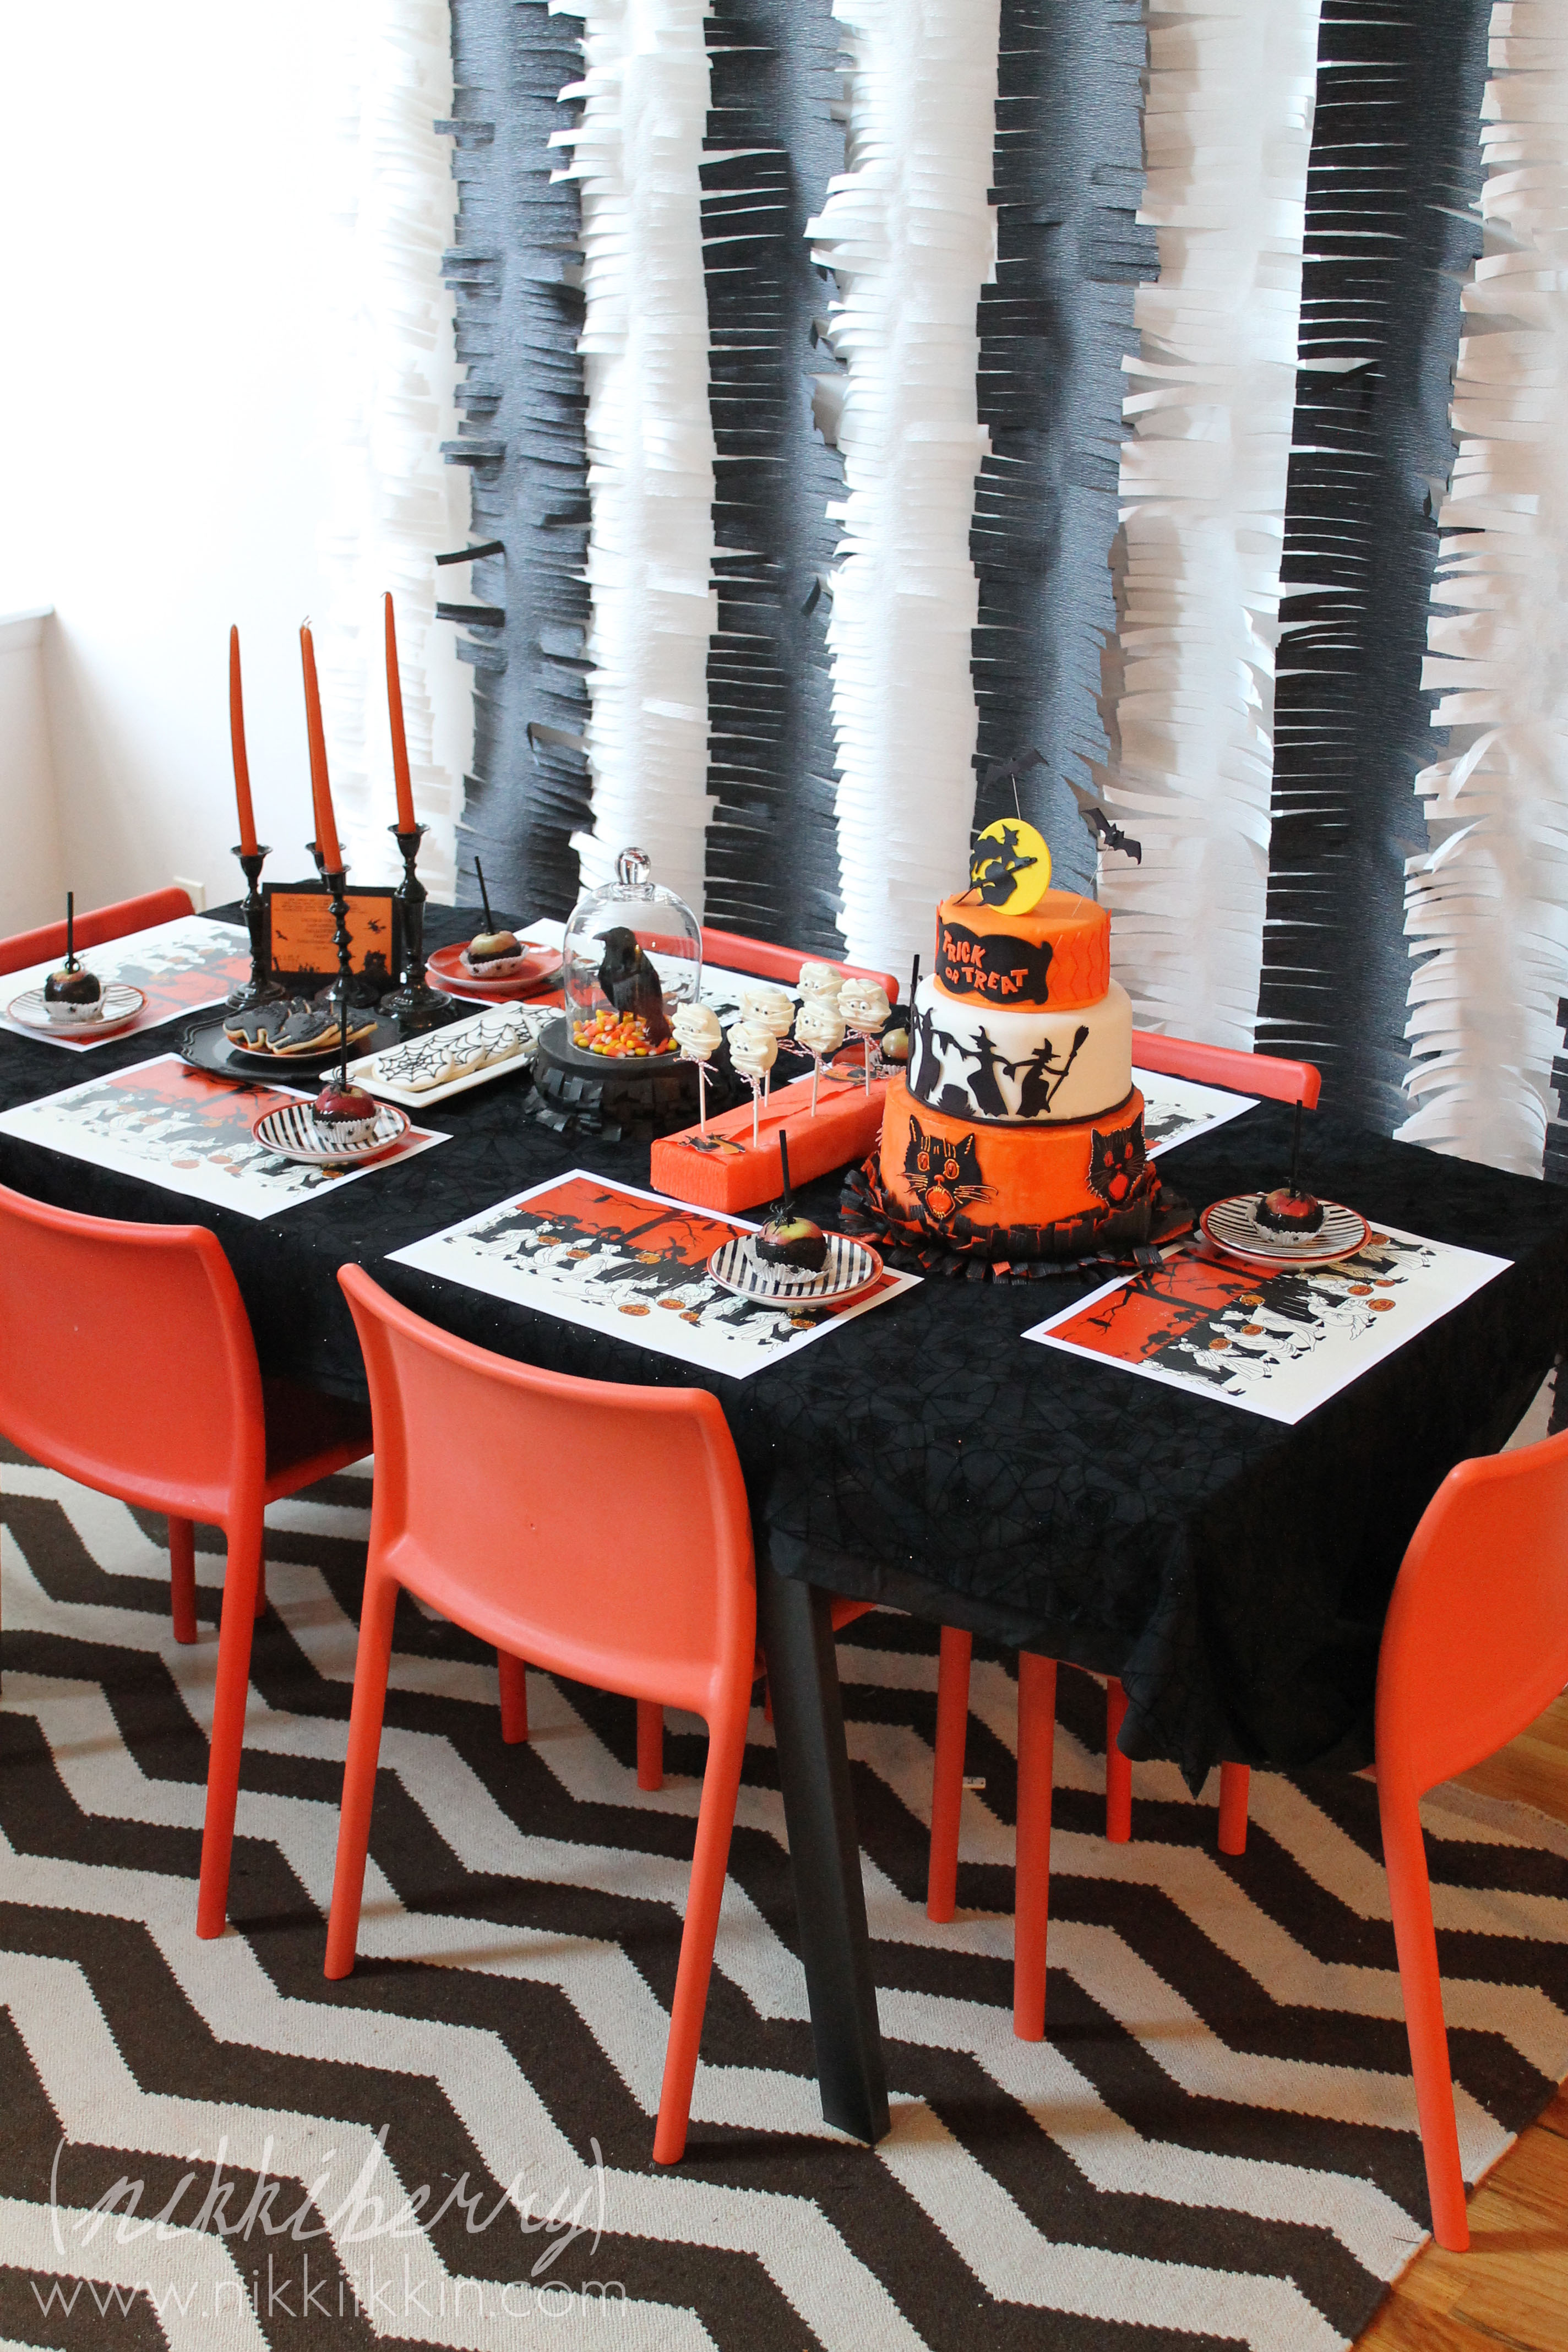
What about that about that wall??!!!  I love big showy backdrops and I was channeling Dorothy Draper with the black and white stripe fringe crepe paper.   Crepe paper can deliver that big of a punch without breaking the bank,  it was so easy to create and so inexpensive.  I covered a 12 foot wall with just 6 rolls at $2 a roll!

Tabletop:

The placemats are vintage Dennison illustrations that were once used on crepe paper banners.  The desert plates are crate and barrel and target.  We always cruise the thrift shops for Halloween decorations, the older and creepier the better.  These candle sticks are brass cast-off that we spray painted black.

nikkiikkin halloween party 5

nikkiikkin halloween 7

The crow curio is a combination of a glass dome sitting and a styrofoam round decorated with fringed crepe paper.  You can see an up close how to about it HERE.

Sweets:

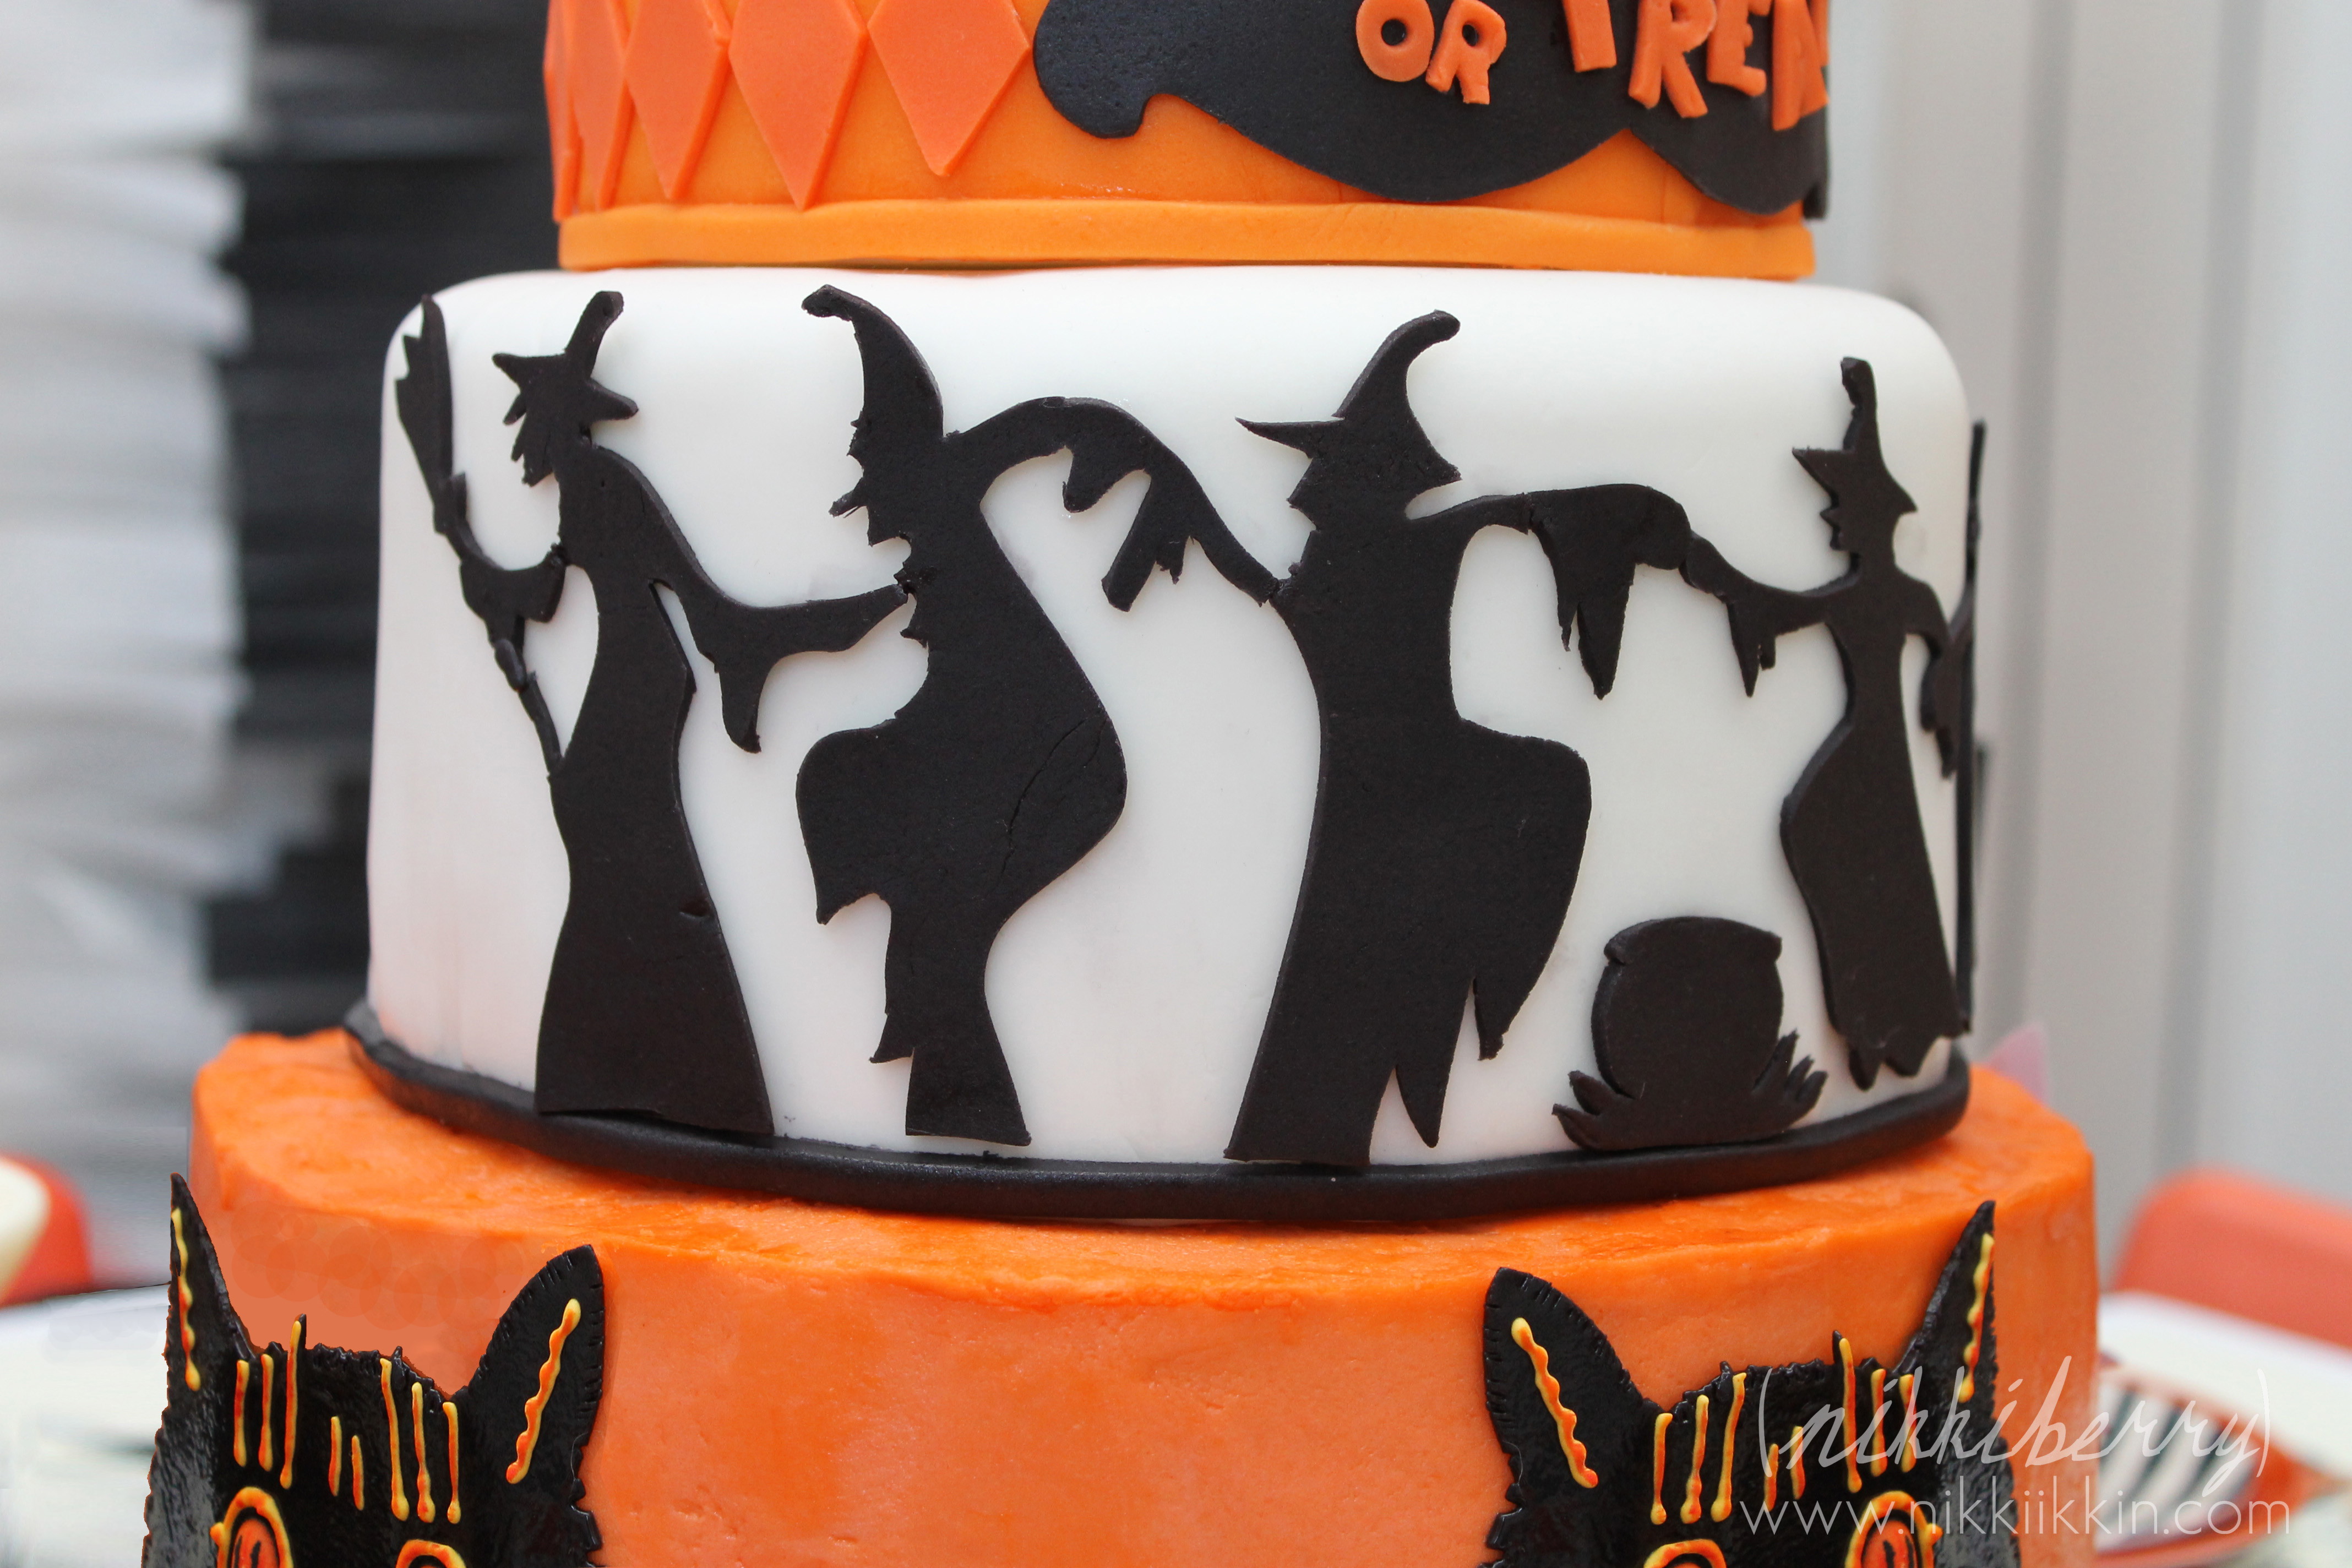
The treats included a scary black cat and spider web cookies, mummy Oreo pops and a three-tiered Trick or Treat cake.

nikkiikkin halloween party 14

nikkiikkin halloween party 13

nikkiikkin halloween 6

A cake this size would easily serve 100 people, so I made two of the tiers as fake dummy cakes.  The cake layers features a Dennison Cat made from fondant, silhouettes of dancing witches and a harlequin pattern reminiscent of a paper lantern.  I finished the cake off with a witch, moon and bat silhouettes fondant topper. You can see more of the cake HERE.  And I have had a request to share the template I used for the dancing witches.  Well, there wasn’t one, I drew it!  But I might go back through my files and see if I can find the inspiration and my original sketch.  If I can I’ll clean it up and share it as a download.

nikkiikkin halloween party 2

nikkiikkin halloween 10

nikkiikkin halloween party 11

nikkiikkin halloween 9

Instead of caramel or red candle apples I came up with “Black Magic” candy apples by coloring the sugar with black gel coloring. Then I dipped it in black sanding sugar for extra sparkle.  See more about them HERE.

nikkiikkin halloween 8

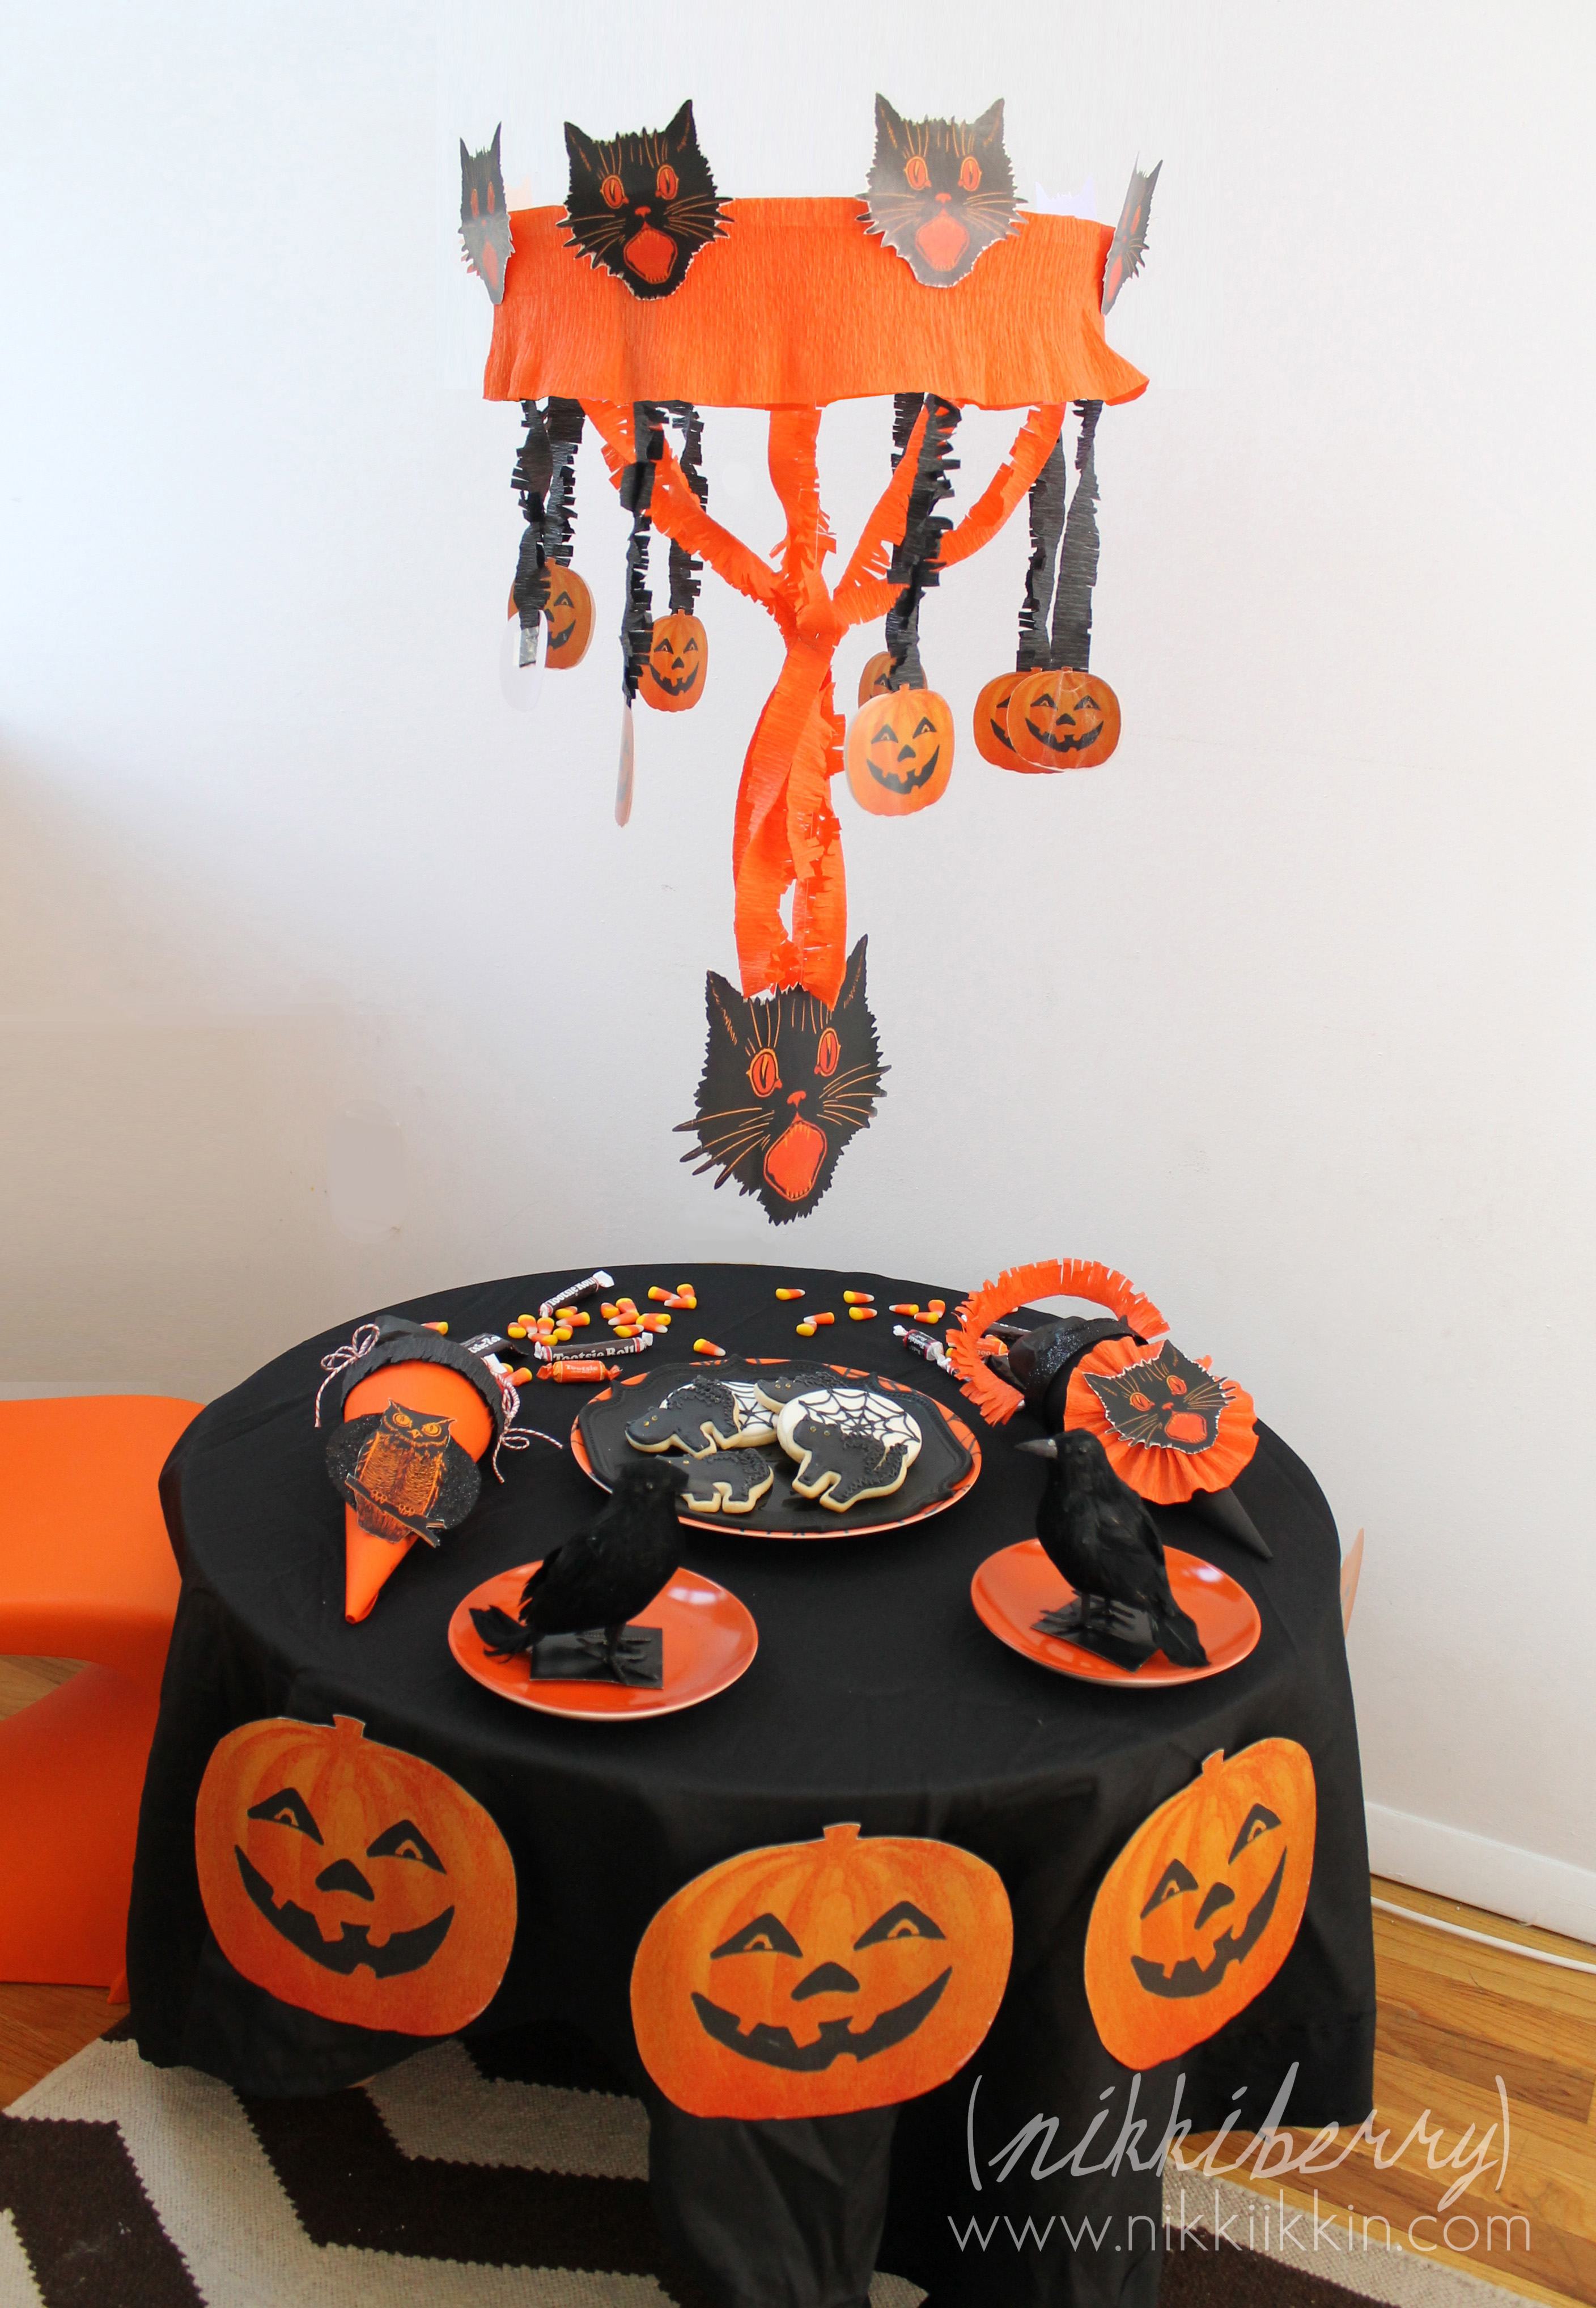
I had more guest (and more decorations) than one table could hold, so the littlest kids at our party had their own table.  Here I used more Dennison inspired imagery.  I created a paper chandelier right from the instructions in a Bogie Book and made tussie mussies to hold candy for the the kids to take home.

nikkiikkin halloween party 17

nikkiikkin halloween party 16

nikkiikkin halloween 19

nikkiikkin halloween 18

And just incase you’re wondering, I didn’t rent orange chairs, those are our own dining chairs.  We use orange in our home decor so it was easy for our Air Chairs and Panton Jr chair to become part of the party decor.

Each year our Halloween decorations box grows, it grew alot last year and I cant wait to reuse almost all of these decorations this year at our Halloween Open House party.  But the questions is do I wait another year to share those pictures or do my readers want to see Halloween posts in November?

3 Comments

Filed under Celebrations, Paper + Fabric, SugarCoated

Pineapple Cake Pop Display

nikkiikkin luau table 1

Yesterday my Luau Dance dessert table was featured on Amy Atlas, its always an exciting honor!  (see the full post and pics HERE).  I made this luau table for my daughter’s 5th grade dance.  I didnt have much time to let my ideas evolve for it, as this was a fast track project.   My offer to create, design & budget were all submitted for approval in just a day or so.  So I was lucky that I didnt have creative block, but this isnt my first luau either!    I immediately knew I wanted to make a centerpiece that mimicked the bountiful fruit offerings at a traditional luau but I couldn’t do it with a cake.  This crazy idea to make a cake pop pineapple came out of know where.  I kept thinking that it reminded me of a croquembouche but in my research I couldn’t find many attempts of other cake artists doing a cake pop croquembouche.  I either had a brilliant idea on hand or an epic fail!

nikkiikkin luau table sketch

nikkiikkin cake pop sketches 1

So I sketched it out, trying to eliminate any potential bad ideas and in my head it seemed like an idea that should work.  I basically decided I was just “chocolate-glueing” cake balls onto a vertical stryofoam surface.  If it didnt work, plan B was going to be a tissue paper pineapple for the centerpiece and just cake pops elsewhere on the table.  Having the plan B definitely helped my confidence.  That, and asking for advice from my sister Jes and friend Jen.  They always put me in my place, they don’t sugarcoat it for me when its just wrong.  As I started down the road on this experimental trip I took pictures with my cell phone and had a group message going to them about my “pineapple progress”  Thats about as much DIY tutorials I do around here….sorry!

nikkiikkin cake pop pineapple1

It seemed yesterday most of the comments on Amy Atlas’s Facebook picture of my party (its up to 250 likes btw!) were about the cake pop pineapple.  I figure some people might be wondering how to make their own sculpted cake pop creation.  So took a look at my text message pictures and sure enough, I had enough to pull together a behind the scenes board on how I made it.  Its not a styled DIY or step by step tutorial by any means, but you can get the concept along with my descriptions.  So here it is!  (Click on the image to enlarge it to full screen for better readability).

pineapple cake pop display how-to 1

7 Comments

Filed under Celebrations, Paper + Fabric, SugarCoated

Woodland Fairy Treasure Hunt

Macy's Woodland Fairy Dessert Table

Macy’s Woodland Fairy Dessert Table

Two years ago we celebrated my daughters 9th birthday with a Woodland Fairie theme.  For the party my daugther, Macy and I created a treasure hunt game meshing symbolic fairy trinkets from Peter Pan, Tinkerbell and fairy folklore.  I used vintage clip art from The Graphics Fairy and From Old Books to create a treasure hunt card that complimented our invitations and printables from B. Nute Productions.  Since posting the party the treasure hunt card has been hands down my most pinned image and referred link from Pinterest.  It is also requested to purchase or be shared often.   I am finally doing something that I should have done 2 years ago.  I am giving this file away free here in this post!  You  may download the card here:

Treasure Hunt free printable }

Enjoy and please be kind and give credit if you use it.   Most of all, I love to hear feedback about your party! XOXO Nikki

Dont miss out on the rest of the Woodland Fairie party HERE!

Nikkiikkin fairy treasure hunt


1 Comment

Filed under Celebrations, Paper + Fabric

Easy Halloween Invitation

It may seem like there isn’t much going on at Nikkiikkin but I have a lot in the works that I’m excited to share very soon!  Right now Im going to squeeze in a few last minute Quick and Easy Halloween Party Idea posts with a decoration or treat that anyone can do!

I have been hand making most of my party invites for more than 10 years, even before I had kidos, we had BIG Halloween and Valentine’s Day parties every year.  While I was digging through our Halloween decorations I came across something that I should have thrown away, but glad I didn’t.  I found the printing process that I created to make one of my favorite Halloween invitations from 2005.  This is pre-photoshop ability for me and it wanted to share it to show that you can make creative invitations for any event without needing knowledge of photoshop or purchasing printables.  You just need a marker, Word and a copy machine!

Here you can see that I literally cut and pasted in my text that I printed from Word.  I drew a simple Halloween silhouette scene (pretty sure I drew this by looking at some other Halloween illustration) and I copied the page onto orange card stock at a kinkos.

What we loved about this invitation it’s that we personalized it to each guest by adding a color photo copy on the back (because my pictures were real pictures from film, not digital) of the guest at a previous party or of our decorated home if we didn’t have a picture of them!

While it might be too late for sending out Halloween invites, there is still time for you to use this same method for tent cards, favor tags and toppers!

Next up in Halloween Party ideas:

Black Magic Candy Apples

Halloween Crow Curiosity


5 Comments

Filed under Holiday, Paper + Fabric

DIY Maps on Closet Doors

Maps are nostalgic.  They take us back to a time and most definitely a place: a city that you visited, were born in or went to college in.  We all can relate some part of our life to a map.   I used to hang souvenir maps of amusement parks on my wall as a teenager.  I relived and dreamed about my trips to Disney World, Cedar Point and Sea World.  When I was designing Hudson’s nursery we made sure to include a map of New York City, the Hudson River being his namesake.

Wanting to take NYC maps in our decor to the next level, I decided to wallpaper the closet doors in the childrens’ room with MTA maps.  These are the easy to get, free maps of our subway system in New York City.  All you have to do is ask a MTA booth attendant for one.  So over the course of a few months  I randomly asked for them until I had about 6 or 7 maps.

To hang the maps on the doors I had some criteria, the most important being that it had to be removable with no damage.  The maps also needed to withstand wear and tear that a 2 year old can inflict on it.

I bounced ideas off of my DIY and interior design friends and several ideas came up.  One was to mod podge the maps to canvas sheets and wrap the doors with the canvas.  This was a great inexpensive idea because rolls of canvas for framing doesnt cost much but I wanted something that would be more durable.

The next idea was combining the maps with clear contact paper, the drawer liner type.  This idea stuck with me but I had many questions about how the end result would look.  Contact paper only comes in 24″ width rolls so that meant that there would be a seam.  Would the seam show?  Is clear contact paper really clear?

I decided to go with the contact paper idea because a single roll of supermarket contact paper could cover 2 closet doors and this project was only going to cost me $6!

Then I sat wondering how I would hang it.  Would I roll out the contact paper sticky side up and arrange the maps on it first, then hang it like real wallpaper?  Or do I tape the maps to the door and then cover it with the contact paper?  I went with the latter.  I sparingly used double stick tape to stick random sizes and shapes cut from the MTA maps on the door. Then I covered it with full sheets of contact paper leaving extra at the top and bottom to wrap around to the back of the door.  The side of the doors where they meet each other also needed to wrap to the back, but I didn’t need to wrap on the hinge side.  Ensuring the contact paper wrapped to the back of the door was an important part.  The contact paper will surely peel if it stops at the edge of the door or on the side of the door.

So did the seams show?  Nope!  Is the clear contact paper truly clear?  YES!  I was prepared to except that the image would be hazy or blurred from the transparent looking vinyl but it wasn’t, it was just as clear as without.

As an after thought and bonus I realized that this vinyl surface could be written on with dry eraser markers.  I haven’t let Hudson do it yet, but I think that he will have fun drawing out a path on the maps or marking up sites he’s been too.  Macy has also used the maps as a quick reference as we were heading out the door and discussing which train to take.  She’s been riding the rails for 6 years now but she is just now interested in knowing how to get around, not that she will be going anywhere alone until she’s like 20.

2 Comments

Filed under NBID, Paper + Fabric

Candy Party Cake and Invitations

For my daughters 10th birthday we celebrated at Dylan’s Candy Bar in New York City.  The party is all-inclusive but the cake and invitations included were not my style so I made my own.

My candy cake was inspired by the signature cakes that Dylan’s Candy Bar uses in photo spreads and displays in the store.

The striped second tier was the most tedious to decorate.  Each fondant stripe was cut to a taper as it wrapped the top of the cake, making a beautiful color wheel.  The top-tier mimicked a strip of nostalgic candy buttons and was topped with real lollipops.

Each sweet guest was sent a custom candy invitation that included a real candy necklace.  See my post on making these candy invitations HERE.

Also pictured is a gumball necklace that my daughter made and wore at her party.  I’ll be posting my methods and tips on making those soon!

To see how the party at Dylan’s Candy Bar turned out click HERE!

Like the cake?  It can be yours!  I am now offering a made to order Faux / Prop Candy Cake in my Etsy shop.  She the listing HERE!

2 Comments

Filed under Celebrations, Paper + Fabric, SugarCoated

Do You Know Vera?

Vera Neumann

No not Wang or Bradley.  Neumann.  Ive been in love with her prints for half a dozen years but only until recently did I figure out who she was.  The first time I came across her signature logo was at an old dusty dress shop on a town square in the middle of no where Tennessee.  My friends and I were antiquing and came across scarves and napkins.   We saw potential in the beautiful patterns to become pillows.   I was curious from the beginning about who Vera was but in my initial internet search many years ago there was nothing that gave me any knowledge about the person or company that illustrated these colorful patterns.

As the sewer of the group, I took home everyones Vera treasures to turn into pillows.  But I hung on to my set of napkins afraid to break them up until I knew who Vera was.  My napkins were pink tulips in various completed illustrated stages, some line drawings, some painted.  Being that they were pink and I had a 3 year old little girl at the time I gave them to her to use in her dress up and pretend play.  They were often set at her tea table or wrapped as blankets around her stuffed animals.

The first set of pillows I made for my friends were scarves in brown polka dot and floral patterns on cream backgrounds.  I sewed ice blue satin to the back being very careful not to cut the scarf incase we wanted ever wanted to take apart the pillow and reclaim it.    I loved them so much, it was hard to send them to her because they also matched my Dwell Studio bedding at the time.

Vera Neumann Scarves made into pillows

The third Vera treasure moved around with me from Tennessee to New York to North Carolina and back to New York again.  It was a larger scarf in two shades of springy green with polka dots and a center circle design.

Vera Neumann scarf

Then it was in New York this spring that I ran across a book about Vera Neumann.  Eureka!! I had finally found Vera!

Vera: The Art and Life of an Icon

image via: craftycookups.blogspot

Excitedly I searched and found so much information from recent product launches with Crate and Barrel, MAC cosmetics and Anthropologie to blogposts celebrating her endless illustrations, Etsy sellers crafting with the linens and information on her company history, which is still very much active.  Here is an excerpt from The Vera Company website:

“The Vera Company owns the extensive library of prints, original artwork, scarves, and the trademarks and copyrights of the late, iconic American artist, Vera Neumann. Vera was a pioneer in design who successfully cross-licensed her designs into linens, scarves and sportswear. Her company began at her kitchen table in 1947 and grew into a multi-million dollar international business. All Vera products started as original pieces of art from her own hand and sported the distinctive Vera signature (often with a ladybug) trademark. After years of being dormant, the beloved Vera brand is back and is experiencing a resurgence among old and new fans alike – for once you know Vera, you adore her.”

Between the 40’s through her death in 1993, with several company changes, Vera designed everything from wallpaper, bedding, table linens to dresses, blouses and her signature scarves.  All signed with her name and sometimes with a ladybug.  8,000 of her designs are copyrighted in the Library of Congress.  With so many works of art designed over a span of 50 years a Vera original can pop up anywhere.  An iconic Vera scarf was all Marilyn Monroe wore in her famous “Last Sitting” shoot in 1962 by Bert Stern.

Marilyn Monroe in Vera Neumann scarf

So I missed the boat on the Anthropolgie products released in 2009, the collection was called We Love Vera.  Apparently it happened during the month that I moved from New York to North Carolina.  So I see how I missed that,  I really wasn’t out shopping while I moved my family across the country and I guess my catalog wasn’t forwarded either.  Design* Sponge gave an excellent report on the launch here.

We Love Vera dress Anthropolgie 2009

We Love Vera skirt Anthropolgie 2009

We Love Vera dress Anthropolgie 2009

We Love Vera skirt Anthropolgie 2009

I also missed the MAC Cosmetics launch, but some products are still available online here.  The embossed “scarf” corner of the face powder is a perfect design element to represent The Vera Company.  Here is a good blog post on the rest of the collection (BTW this blog author gives EXCELLENT make-up tutorials on YouTube, I just realized she the same girl who taught me how to apply my Red Queen halloween make up).

MAC cosmetics Vera Collection face powder

But I did NOT miss the Crate and Barrel launch of dish towels and aprons.  Mainly because I receive the CB catalog every few weeks and I had already learned about Vera from the book.  So she was in my radar now.  I picked up a few dishtowels (the ones pictured below) and they go nicely with my green backsplash and orange Air Chairs.

After getting excited about discovering the beauty of Vera I realized I still owed my friend a pillow from the scarf that moved around with me for half a dozen years.  I turned that green dotted scarf into a large euro size pillow with luscious white silk envelope back.

Vera Neumann vintage scarf pillow

Vera Neumann vintage scarf pillow

Vera Neumann vintage scarf pillow

So now you know Vera and next time you are out vintage shopping or maybe just at the mall, pick up some brightly colored works of art and start your own collection.

4 Comments

Filed under NBID, Paper + Fabric

Vintage Singer Sewing Cabinet

About 10 years ago I received a hand-me down sewing desk with a 1970’s Singer included.  The Singer sewing machine was a beauty but I didnt feel like I  was the right person to invest in its resurrection, so I chucked it.  But I’ve hung on to the sewing desk.  Its been used in several of our homes usually as an entry piece because of its small size.   It came to me in very good condition as a solid wood piece in a hickory stain and although I adore natural wood we recently decided that we would like to paint it gray.  It turned out to be an excellent idea that I dont regret it at all.  We used an oil base Benjamin Moore, color #1483 – Cos Cob Stonewall, its a cool medium gray with green undertones.  It was the same paint that I used to match an Ikea Hack to Hudson’s Oeuf Sparrow Crib.

I don’t have any pictures of how my cabinet looked before we painted it but I do have the manual that had some other models pictured on the back.  When I thought about sharing my DIY of this cabinet I did a little research to find another existing cabinet like mine without much luck.  I did find two similar models just like the ones pictured on the back of my instruction manual.  One is in the excellent shape that mine is in and is going for $300 on ebay in Phoenix and the other not so great shape for $50 at a thrift store in Mesa, AZ. Both with the same type Singer Machine that I chucked.

When we moved into our Brooklyn apartment we stretched the limits of our imagination to repurposed this vintage beauty yet again. I affixed waffled dish towels with a staple gun to serve as an apron with inverted pleats.  This apron allowed us concealed storage underneath,  but you wont believe what we put under there……the kitty litter box!  We had no hiding spot for the cat box in this loft style apartment and by coincidence our size box just happen to fit.  I’ll spare you the gorry details but I promise its under that curtain and yes from one angle it can be seen but wrapping the entire cabinet was not ideal for kitty entry and ventilation.

We have been so pleased with the way our cabinet fits right into our changing style, its been a chameleon of sorts and I suppose I’ll always make it work for us.  I believe thats what a piece of  furniture with good bones does, its always in style and it can be updated with just a change of accessories or a coat of paint.  In fact I am already working on restyling this piece with new objects d’art  I received for Christmas: a Dwell Studio Urchin and a CB2 Neville House.  I was especially excited to match up the Urchin’s bronze coloring to the existing pulls on the Singer cabinet because for a while I considered replacing them with something modern.  Nope, they are complimented perfectly now and I’ve made the first step in adding bronze as metal accent to my home.  Our CB2 Ada lamp stays, (it’s another perpetual piece in the Berry residence) but I am in the market for new art.  Any ideas  anyone?

Dwell Studio Urchin & CB2 Neville House on a refurbished vintage Singer Sewing Cabinet

6 Comments

Filed under NBID, Paper + Fabric

Red Riding Hood Cape

For my niece’s 4th birthday I made her a red riding hood cape.  Macy sat by me and drooled the entire time I made it.  Only because I promised her that I would make her one next did she not complain that Emma was getting such an awesome gift.  Although the gift was a surprise, I think that my sister had mentioned she wanted me to make emma a red cape one day, so I already had a little  bit of direction to get started.  Im not great at making clothes, I can do basic skirts and dresses.  Im better at embellishing pre-made clothes but I figured a cape couldn’t be that hard.  I was right, it wasn’t hard, it turned out great and I can’t wait to make Macy’s soon.  (she has already picked out the colors – navy with a kelly green lining)

I ordered the fabric for this cape from Fabric.com.  Its a great resource if you want to shop from your sofa and are not too worried about seeing the fabric first hand before you buy.  They offer free shipping after $35 and all of their fabrics seem to be discounted (at least they seem discounted compared to NYC prices).  I choose a red wool but it was the patterned lining that I had more fun looking for.  I’ve been an admirer of Amy Butler fabrics for a while but I haven’t had a project in mind for them.  This was the perfect time to try one out.  I choose Passion Lily Cerise Pink from the Soul Blossoms collection.  Which by the way, you can also get in a blue colorway wallpaper from Graham and Brown

I’m brave enough to come up with my own patterns for most projects including a cape but I decide to give the internet a whirl and see what DIY offerings were out there.  I stumbled across a crafty site called FleeceFun.com that offers free printable pdf patterns.  It had the perfect cape pattern all ready for me to download and a video tutorial to walk you thought how to do it! So how does a printable pattern work? When you download this pattern its about 15 pages to print out, you line them up and tape them together to have a full scale pattern ready to cut out.  Although I liked the fleece fun pattern, there were a few details that it lacked for me. I wanted my entire cape lined, this pattern just shows you how to line the hood.  Also I wanted Emmas cape to function more as a coat, so the edges needed to overlap not just meet.   I can’t tell you how I made all that happen for me, I just did.  Thats how most of my projects are, I just do it.

Isn’t it beautiful?

And isn’t she beautiful in it?

Happy Birthday Emma!

P.S. You can see my sister’s photography site here!

4 Comments

Filed under Baby + Child, Paper + Fabric

Nikkiikkin Design Studio On Etsy

Ive been a Etsy shopper for years, but now Im a seller too!  Its long over due and was nearly as time consuming to set up as a blog, phew!  I plan on selling party supplies like printables and decorations to start.  I will soon be venturing into making Fondant Cake Kits for the shop too.  Im super excited about these, check back later to hear what they are all about!

Woodland Dessert Table Kit for sale on Etsy

Currently at the Grand Opening, I have listed my Woodland Dessert Table Kit.  This kit includes many handmade items as well as supplies to set up an amazing tablescape like Macy’s Woodland Fairie Party Table.  As a bonus a scavenger hunt game is included with the kit.  Check out the listing here: update this item was sold, but please contact me if you interested in me creating a tablescape for you!

Macy and her Woodland Fairy Dessert Table

Comments Off on Nikkiikkin Design Studio On Etsy

Filed under Design Studio, Paper + Fabric

The Initial Frame

 My sister has reprimanded me, she says that I have to do my postings more tutorial like.  Well I promise when I get to a new project that I will photograph it step by step.  But right now im still playing catch up with about 9 years worth of fabulous projects that Ive done!  I have always photographed the final results but never the process, this one is easy enough that I can recreate the process in a tutorial way without the step by step pictures. S0 Jes, this ones for YOU!

Macy and Hudson's Initial Frames

Initial frames! This is a very old project of mine, but it still proudly hangs in my childrens’ room and in the rooms of the loved ones Ive created one for.   It is a very simple and inexpensive project, I once made about 10 at one time as Christmas gifts for all the children in our family and in Macy’s playgroup.

Initial Frames for Macy's Playgroup

Supplies for this project:

  • a wooden 8×10 frame – cheap,  from anywhere like a craft store or ikea
  • acrylic paints – super cheap again, a $1 bottle is enough
  • a wooden letter – there’s a trend here… cheap from a craft store
  • fabric scrap at least 10×12 – free! if you are a crafter that has it lying around
  • a 1/2 yard of ribbon or twine – again you know you have some somewhere
  • a slightly smaller than 8×10 cut of mat board – in the framers aisle at craft store
  • hot glue gun – the classic
  • staple gun – you can do it without this, but if you dont want the letter to fall off and hit the baby in the head then  barrow one.

First step is to remove the glass from the frame but save the backboard as you still want that so that it looks nice and finished when its done.

Next paint the letter and wooden frame.  Just like any project with wood you might decide that it needs a little sanding prep before the paint.  Use your discretion.  Acrylic paint dries in a matte or chalky finish.  If you dont like that you can use a spray gloss sealant to give it a sheen.  But be cautious:  some of the glosses will turn the paint a yellowish color.  I had a pink letter turn an unusable color.  So I play it safe and just leave it like it is.  Or you can buy higher quality paint that has a gloss finish already.

Hudson's Initial Frame

While your paint is drying you can begin the fabric covered mat board.  Make sure the board is slightly less that 8×10 because the fabric will need space to live tucked in the frame too.  Wrap the fabric onto the mat board and hot glue the long and short sides.  Leave the corners for last and either fold down one side then the other or make a pinched triangle like miter cut and glue down with lots of hot glue.  The fabric covered board should fit snuggly into the frame the same way the glass did before you removed it.

Cowboy Initial Frame

Next position the letter in the center of the board with hot glue.  ***And here’s where Im making the safety disclosure** Hot glue is temperamental.  Its not really a glue right, its plastic and when its cold it lets go of what it should be holding onto.  In my practice with these initial frames I found a super easy way to make sure the letter doesnt pop off no matter what type of fabric you have tried to adhere it to.  After you have the letter glued into place, turn the board over and fire a few staple gun staples through the back of the mat board, into the back of the wooden letter!  Yes, its that easy.  Now the letter isnt going anywhere.  Put the board back in the frame, put the backboard of the frame back on and fasten it closed.

Macy's Initial Frame

You may have a frame that came with an easel back or no easel and a saw tooth hanger.  You can still hang this initial frame on the wall regardless of its backboard type.  Staple your ribbon or twine to the back to use as a hanger.  If you borrowed a staple gun, you might realize by now that its a really good tool to have and they are not expensive so grab one on your next trip to Lowe’s. Just remember to keep in out of reach and locked away from little hands, I even keep ours unloaded.

3 Comments

Filed under Baby + Child, Paper + Fabric

Under the Sea Birthday Party Invites + Mermaid Barbie Cakes

For my daughters 5th birthday the theme was Under the Sea.  I am only sharing the invitation and cakes from the party, but this was a fantastic pool party and a success with my daughter who is my biggest fan and littlest critic!

Under the Sea Invite Shaker

This party’s invtation is a very unique “shaker” card that we really sent through the mail.  As you can see from the profile shot above it is a thick card that required extra postage but arrived to our guests fine.  I believe I did write “hand cancel” on the envelopes to help them receive some TLC at the post office but who knows if that really helped!  These cards where on the complex side to create but they were worth it and were an impressive surprise for our guests to receive.  Heres how they came together:

Supplies:

  • 1/4 thin foam core board
  • colored scrapbook paper
  • transparency film
  • confetti
  • glue stick
  • xacto and cutting mat

To assemble:

The informational side of the card was designed and printed as a 5×5 square.  5″ squares were also cut out of the foam core, transparency film and unprinted scrapbook paper.  A center circle (a square would work too) was cut from the foam core and scrabookpaper.  And then it was like a sandwich, stacked up with the info face down glued to the foamcore, confetti sprinkled inside, transparency film to seal it and the scrapbook paper to cover and complete it.  Being our theme was Under the Sea, this was meant to look like a fish bowl but it could be reinterpreted for any theme.

Under the Sea Mermaid Kelly Doll cake

Under the Sea Cupcakes

I have mentioned before that my spoiled little mice get more than one cake for their birthdays because there are usually separate days of celebrating.  Macy had two parties her 5th year with this theme, one at school and one with family and friends. On her actual birthday she enjoyed Under the Sea character cupcakes at school and a Mermaid Kelly Doll cake at home with us.  This was my first Barbie type cake.  Little Kelly was easy to turn into a mermaid by simply covering her legs with individual scales made out of fondant, all her Sea friends were fondant also.  These characters were on the simple side of creation, by todays standards it takes much more complex cupcake toppers to impress.  (You can see some of my current cupcake work in my Yo Gabba Gabba cupcake masterpieces here)

Under the Sea Mermaid Barbie cake

There is an interesting story behind the real Under the Sea party that year.  It was one of a few times that we decided to return back home to Tennessee to celebrate with family and friends.  Flight delays and ultimately a flight cancellation nearly kept us from getting to TN.  When we did get there it was just a few hours before the party and without our luggage full of party supplies.  To save this party I picked up two pre-made cakes from a big box store, I think they were the Carebear cloud designs but they worked as ocean too.  I grabbed a new Barbie and some fondant and within an hour the cake was complete!   I hope that my emergency cake experience for this party can one day help someone else out if they are in a pinch to produce a custom cake.  Dont panic, just add to a ready made and no one will be able to  tell that it is a impromptu design!

8 Comments

Filed under Baby + Child, Celebrations, Paper + Fabric, SugarCoated

Embroidery fit for a Little Queen


Little Queen Sunburst 2010

Emma wears her shirt from Aunt Nikki!

I have a dear little niece named Emma that is like one of my own mice.  She is only three but has already been the recipient of many of the creative works that will be featured on NikkiikkiN.  Last year this little cutie won her first beauty pageant at the age of 2!  She was the Little Queen Sunsburst of Michigan!  To commemorate her title I made her an embellished shirt that would announce it to all.  This shirt was made with a few different crafting techniques: iron-ons, embroidery and appliques.

Commemorative shirt for my pageant queen niece

The back of Little Queen Sunburst's shirt

The state of Michigan is one of the most recognizable states in America with its mitten hand shape.  As preschoolers we were all taught how to point out on our own hand where in Michigan we lived, ask any Michigander what part they’re from and they’ll probably still do it, lol! 

I wanted to incorporate that mitten shape with a crown and came up with an applique design of the mitten being crowned.  I didnt need to purchase many supplies for this project. Being a crafter and interior designer you can only imagine all the fabric I have access to, fabric samples and embroidery thread are both staples in my crafting boxes.  I used Wonder Under fusible web on all the appliques to give them staying power and then did a blanket stitch around the upper and lower portions of the state.  The crown was made from a wool felt that wasnt going to unravel so I only did a straight stitch around it.  For the front of the shirt I wanted the word “queen” to stand out and used glitter iron-on letters from Michael’s craft store.  The rest of the words were hand embroidered in a rope stitch, which didn take that long after I lightly drew the words in pencil. 

I used a great online site Stitch School  to refer to for instructions and tips.  I also have the The Embroidery Stitch Bible by Betty Barnden to look at while I work.  An embroidery hoop is a must for embroidery work and luckily they are still an inexpensive craft tool.  I have a small one from childhood and a larger one that I bought to work on Hudson’s Owl quilt.  (I recently have seen the wooden embroidery hoops being used to display fabric as art on walls, what an innovative and economic gallery wall that makes, maybe ill try it one day!)

Of course Emma loved her shirt, my sister was excited about it too and she proudly saved it as a keepsake with all of Emmas trophies and crowns from her big day.

Comments Off on Embroidery fit for a Little Queen

Filed under Baby + Child, Paper + Fabric

Newspaper Tree Canvas


Recently my Oliver the Owl Nursery picture was used on a Pinterest.com pin board.  (How exciting!)  The author of the pin board commented “love these easy to make trees!”    Yes, thank you, they were easy to create and you can see the rest of the room right here!

I love graphic trees!  Symbolic representations of almost anything make me swoon.  Hudson’s nursery had a Owl theme, sorta, I wanted to throw in trees too.  Over his bed I created a triptych (thats a work of art which is divided into three sections) and in it I incorporated newspaper to play off of his gray bed.  My tree shapes were inspired from different sources that I sketched out and changed to suit me.  I used a custom acrylic paint as the back ground and created the decoupage newspaper shapes before adhering them to the canvas.  This gave them a look different than if I had placed the newspaper directly on the canvas to decoupage.  After the tree tops were in place (and this took a while because I always take a lot longer than most people to do what looks simple.  But thats okay, size, shape and balance are very important to my eye) I penciled in the trunks and then painted it a dark graphite.  That was it.  A spray sealant or thick layer of Mod Podge could have been added afterwards but I didnt think it needed it.

If you havent heard of  Pinterest.com, check it out.  “Pinterest is a place to catalog the things you love”.   So save some file space on your hard drive and gather those inspiring internet pictures over there.  The best part: the website is set up for users to give credit and link back to where they discovered the photo.  I really appreciate that, not only because I myself, am guilty of not knowing where I borrowed some pics from, but because it gives other users the opportunity to check out the owner of the pic too.  The down side to this site: you must have an invite to play!  So even though I have a photo showcased on a  pin board, I am on the waiting list to have an account!

1 Comment

Filed under Paper + Fabric

Chrysanthemum Invatation

Invatation, favor tags and vintage table cloth as the inspiration

Comments Off on Chrysanthemum Invatation

Filed under Paper + Fabric

The Initial Canvas

Madeline & Whitney

I’ve been experimenting with canvases for about a year, for this project I did a complete decopauge with scrapbook paper and acrylic paint.   These canvases were birthday gifts for the daughters of friends.  I used their existing bedroom bedding, pictured to the right, as my inspiration for style and color.  The initial is hand drawn and painted, but I enlarged and traced embroidery patterns to make the letters look more unique.. 

Comments Off on The Initial Canvas

Filed under Baby + Child, Paper + Fabric