Tag Archives: monogram

The Initial Frame

 My sister has reprimanded me, she says that I have to do my postings more tutorial like.  Well I promise when I get to a new project that I will photograph it step by step.  But right now im still playing catch up with about 9 years worth of fabulous projects that Ive done!  I have always photographed the final results but never the process, this one is easy enough that I can recreate the process in a tutorial way without the step by step pictures. S0 Jes, this ones for YOU!

Macy and Hudson's Initial Frames

Initial frames! This is a very old project of mine, but it still proudly hangs in my childrens’ room and in the rooms of the loved ones Ive created one for.   It is a very simple and inexpensive project, I once made about 10 at one time as Christmas gifts for all the children in our family and in Macy’s playgroup.

Initial Frames for Macy's Playgroup

Supplies for this project:

  • a wooden 8×10 frame – cheap,  from anywhere like a craft store or ikea
  • acrylic paints – super cheap again, a $1 bottle is enough
  • a wooden letter – there’s a trend here… cheap from a craft store
  • fabric scrap at least 10×12 – free! if you are a crafter that has it lying around
  • a 1/2 yard of ribbon or twine – again you know you have some somewhere
  • a slightly smaller than 8×10 cut of mat board – in the framers aisle at craft store
  • hot glue gun – the classic
  • staple gun – you can do it without this, but if you dont want the letter to fall off and hit the baby in the head then  barrow one.

First step is to remove the glass from the frame but save the backboard as you still want that so that it looks nice and finished when its done.

Next paint the letter and wooden frame.  Just like any project with wood you might decide that it needs a little sanding prep before the paint.  Use your discretion.  Acrylic paint dries in a matte or chalky finish.  If you dont like that you can use a spray gloss sealant to give it a sheen.  But be cautious:  some of the glosses will turn the paint a yellowish color.  I had a pink letter turn an unusable color.  So I play it safe and just leave it like it is.  Or you can buy higher quality paint that has a gloss finish already.

Hudson's Initial Frame

While your paint is drying you can begin the fabric covered mat board.  Make sure the board is slightly less that 8×10 because the fabric will need space to live tucked in the frame too.  Wrap the fabric onto the mat board and hot glue the long and short sides.  Leave the corners for last and either fold down one side then the other or make a pinched triangle like miter cut and glue down with lots of hot glue.  The fabric covered board should fit snuggly into the frame the same way the glass did before you removed it.

Cowboy Initial Frame

Next position the letter in the center of the board with hot glue.  ***And here’s where Im making the safety disclosure** Hot glue is temperamental.  Its not really a glue right, its plastic and when its cold it lets go of what it should be holding onto.  In my practice with these initial frames I found a super easy way to make sure the letter doesnt pop off no matter what type of fabric you have tried to adhere it to.  After you have the letter glued into place, turn the board over and fire a few staple gun staples through the back of the mat board, into the back of the wooden letter!  Yes, its that easy.  Now the letter isnt going anywhere.  Put the board back in the frame, put the backboard of the frame back on and fasten it closed.

Macy's Initial Frame

You may have a frame that came with an easel back or no easel and a saw tooth hanger.  You can still hang this initial frame on the wall regardless of its backboard type.  Staple your ribbon or twine to the back to use as a hanger.  If you borrowed a staple gun, you might realize by now that its a really good tool to have and they are not expensive so grab one on your next trip to Lowe’s. Just remember to keep in out of reach and locked away from little hands, I even keep ours unloaded.

3 Comments

Filed under Baby + Child, Paper + Fabric

Embroidery fit for a Little Queen


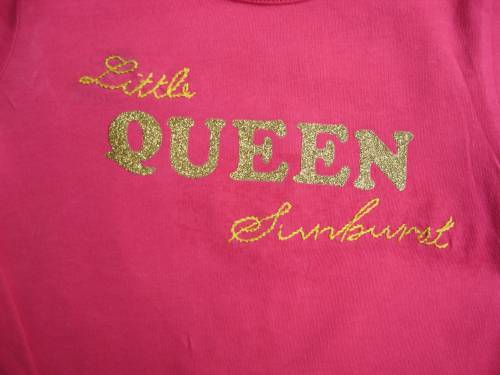
Little Queen Sunburst 2010

Emma wears her shirt from Aunt Nikki!

I have a dear little niece named Emma that is like one of my own mice.  She is only three but has already been the recipient of many of the creative works that will be featured on NikkiikkiN.  Last year this little cutie won her first beauty pageant at the age of 2!  She was the Little Queen Sunsburst of Michigan!  To commemorate her title I made her an embellished shirt that would announce it to all.  This shirt was made with a few different crafting techniques: iron-ons, embroidery and appliques.

Commemorative shirt for my pageant queen niece

The back of Little Queen Sunburst's shirt

The state of Michigan is one of the most recognizable states in America with its mitten hand shape.  As preschoolers we were all taught how to point out on our own hand where in Michigan we lived, ask any Michigander what part they’re from and they’ll probably still do it, lol! 

I wanted to incorporate that mitten shape with a crown and came up with an applique design of the mitten being crowned.  I didnt need to purchase many supplies for this project. Being a crafter and interior designer you can only imagine all the fabric I have access to, fabric samples and embroidery thread are both staples in my crafting boxes.  I used Wonder Under fusible web on all the appliques to give them staying power and then did a blanket stitch around the upper and lower portions of the state.  The crown was made from a wool felt that wasnt going to unravel so I only did a straight stitch around it.  For the front of the shirt I wanted the word “queen” to stand out and used glitter iron-on letters from Michael’s craft store.  The rest of the words were hand embroidered in a rope stitch, which didn take that long after I lightly drew the words in pencil. 

I used a great online site Stitch School  to refer to for instructions and tips.  I also have the The Embroidery Stitch Bible by Betty Barnden to look at while I work.  An embroidery hoop is a must for embroidery work and luckily they are still an inexpensive craft tool.  I have a small one from childhood and a larger one that I bought to work on Hudson’s Owl quilt.  (I recently have seen the wooden embroidery hoops being used to display fabric as art on walls, what an innovative and economic gallery wall that makes, maybe ill try it one day!)

Of course Emma loved her shirt, my sister was excited about it too and she proudly saved it as a keepsake with all of Emmas trophies and crowns from her big day.

Comments Off on Embroidery fit for a Little Queen

Filed under Baby + Child, Paper + Fabric

A wedding to remember

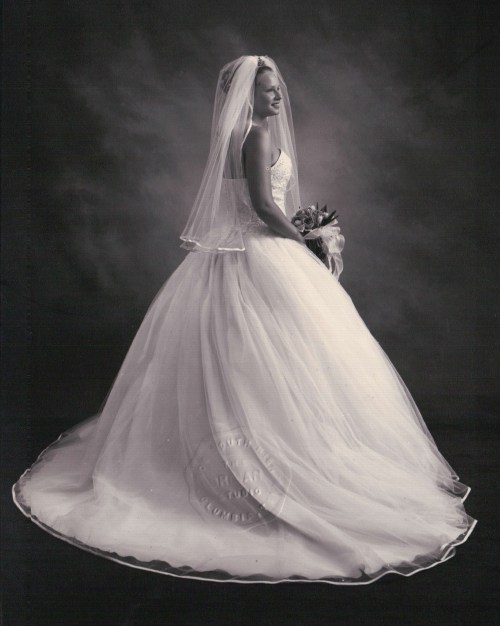
My favorite wedding picture


 This week I celebrated my tenth wedding anniversary! As I reminisce of my wedding and the planning that went into it, I think fondly about the excitement I found in researching and sourcing the details.  I guess it was my first Celebration to plan, as it probably is for most young brides.  This was before every product you can imagine was on the internet, I actually had to buy books and magazines to find inspiration.  Most of mine came from Martha Stewart Weddings, which I still adore today.  Theknot.com had just launched and I was chosen to receive one of their planning kits in the mail.  I filled it with clippings, articles and brochures that I pulled or found at bridal shops.  I made a real scrapbook of things that I liked, as the digital inspiration boards that anyone can do today was only done by graphic designers in the magazines. I still have all of those scrapbooks and keepsakes but not in a location that I can pull them out and look through today. 

 So I thought it would be a fantastic idea to recreate my wedding dreams, ten years later, in the medium I would do today.  Some of the pictures I found online are similar to what I choose & some are the same item (thank goodness MS website has archives!) Overall this is the feeling of my wedding I created ten years ago at the tender age of twenty!

My recreated inspiration board

For my dress I was smitten with ballerinas and a favorite picture of Marilyn Monroe.  Mine had to be a tulle ball gown and the bigger the better!  Madonna had just worn this tiara to wed Guy and I sourced one nearly identical for myself.  Our color started as a dark purple but since it was a spring outdoor wedding I lightened it to lilac.  My bridesmaids wore a dress of organza overlay with a satin sash and carried my favorite flower, the hydrangea.  My hand tied bouquet was made of sweet peas, purple tulips and white roses.  Jacob and his groomsmen wore white stephanotis.  Many of our decorations were in a spherical shape such as the paper lanterns that hung from the trees over the reception tables, the vases filled with hydrangea and the topiaries that were scattered about. We were married in our home town, on the front steps of Elm Springs, an Antebellum home built in 1837 and our reception was also in the home and on the property.  For favors, we discovered candied violets to order from France in a MS Weddings issue, they were packaged in a gift box with a purple ribbon.  This is our invatation, it is square vellum with silver dots and silver envelope lining.  My cake was also out of a MS Weddings issue and the baker did a fabulous job!  It looked exactly like this!  We did a sparkler farewell and by luck a photo was captured that has been our most favorite from the start.  My wedding portrait was done a few days before the wedding, with a photographer that has been photographing Jacob’s family for more than 50 years!  This black and white proof is now a full oiled portrait on my wall and it is breathtakingly romantic! (you can see  the portrait on my living room gallery wall here). 

Nikki (Brown) Berry by Orman Photo Shop Columbia Tennessee

1 Comment

Filed under Celebrations

The Initial Canvas

Madeline & Whitney

I’ve been experimenting with canvases for about a year, for this project I did a complete decopauge with scrapbook paper and acrylic paint.   These canvases were birthday gifts for the daughters of friends.  I used their existing bedroom bedding, pictured to the right, as my inspiration for style and color.  The initial is hand drawn and painted, but I enlarged and traced embroidery patterns to make the letters look more unique.. 

Comments Off on The Initial Canvas

Filed under Baby + Child, Paper + Fabric